Swiss Meringue Buttercream

Prep: 25 min Cook: 5 min Total 30 min Use for Oatmeal Cream Pie Cake

Ingredients

  • 6 large egg whites (240g)
  • 2 cups (400g) granulated sugar
  • 1 and 1/2 cups (3 sticks; 350g) unsalted butter, softened but still cool and cut into Tbsp size pieces (*see note*)
  • 2 teaspoons pure vanilla extract
  • 1/8 teaspoon salt

Instructions

  1. Separate the eggs: If you haven’t done so yet, separate the eggs first. Separate 1 egg white in a small bowl, then place the egg white in your heatproof mixing bowl. Repeat with the remaining egg whites. This way, if a yolk breaks in one of them, you don’t waste the whole batch.
  2. Whisk sugar into the egg whites, then set the bowl over a saucepan filled with just two inches of simmering water over medium heat. Do not let the bottom of the egg whites bowl touch the water. Whisk the whites and sugar constantly until sugar is dissolved and mixture has thinned out, about 4 minutes. The mixture will be thick and tacky at first, then thin out and be frothy white on top. To test that it’s ready, you can use your finger or an instant read thermometer. Lightly and quickly dip your finger (it’s very hot, be careful) and rub the mixture between your thumb and finger. You shouldn’t feel any sugar granules. If using a thermometer, the temperature should read 160°F (71°C).
  3. No need to let it cool down to start this next step– it’s important to begin mixing while it is still warm. Transfer mixture to the bowl of a stand mixer fitted with a whisk attachment (if you aren’t already using the metal bowl that comes with it). You can use a hand mixer instead, but this step takes awhile and your arm tires quickly. On medium-high speed, beat the mixture until stiff glossy peaks form and the meringue is no longer warm to the touch, at least 10-15 minutes. On particularly humid days, this has taken me up to 17-18 minutes. If it’s still not reaching stiff peaks, stop the mixer, place the bowl–uncovered–in the refrigerator for 10 minutes, then return to the mixer and continue beating until stiff peaks form. (This has always worked for me when it’s taking forever to reach stiff peaks.)
  4. If the bowl and meringue still feel warm, wait until both cool to room temperature before adding the butter in the next step. Feel free to place it in the refrigerator. A warm bowl and meringue will melt the butter.
  5. Switch the stand mixer to the paddle attachment. On medium-high speed, add the butter 1 Tablespoon at a time. Wait for the butter to fully mix in before adding the next Tablespoon. After all the butter has been added, turn the mixer down to medium speed and fully beat in the vanilla and salt, about 30 seconds.
  6. Your Swiss meringue buttercream should be thick, creamy, and silky smooth and is ready to use on any cake, cupcake, or other confection.
  7. Too Thick or Too Thin: If your meringue has separated, curdled, or is too thick at any point after you mix in all of the butter, place the mixture in your heat-proof bowl back over a pot of 2 inches of simmering water. Without stirring, let the edges of the meringue warm up and become liquid (the center of the meringue will still be solid), about 1-2 minutes. Remove from heat and return to the mixer. Beat meringue on low speed for 30 seconds, then switch to medium-high speed and beat until smooth, about 2 minutes. Works every time. If your mixture has become too thin and soupy after you add the butter, place the entire bowl in the refrigerator (covered or uncovered, doesn’t matter) for 20 minutes to cool down, then return it to the mixer and beat on medium-high speed until thickened. More troubleshooting tips in the post above.

Notes

  1. Make-Ahead, Storing, & Freezing Instructions: Swiss meringue buttercream is great left covered at room temperature for 1-2 days, but after that, refrigerate it for up to 5 days or freeze up to 3 months. If freezing, store in an airtight container, then thaw it at room temperature on the counter. Once completely at room temperature, about 72°F (22°C), place into the bowl of your stand mixer fitted with a paddle attachment and beat for 2-3 minutes until creamy again. If it separates or curdles, see step 8.
  2. Yield: This recipe yields about 5 cups of frosting, which is enough to fill and frost a two layer 9-inch cake with a generous amount, to fill and frost a three layer 9-inch cake with just enough frosting, to lightly frost 2 dozen cupcakes, to heavily frost 1 dozen cupcakes (I had just enough for the huge swirls on 12 of the pictured cupcakes), or a 9×13 inch sheet cake (with some frosting leftover).
  3. Egg Whites: For best success, I recommend using fresh eggs instead of carton egg whites. Here are all my recipes using leftover egg yolks. Eggs separate much easier when they’re cold. Separate the egg whites one at a time and place the egg white into a large heat-proof mixing bowl (or a double boiler or the metal mixing bowl from your stand mixer) before separating the next. This way, if a yolk breaks in one of them, you don’t waste the whole batch.
  4. There’s almost always a way to fix “ruined” Swiss Meringue Buttercream and it usually has to do with temperature. See step 8 as well as my troubleshooting tips in the post above.
  5. Butter: This buttercream will thin out and become liquid-y if the butter is too warm. Make sure you’re using butter that is slightly cooler than proper room temperature butter. Remove butter from the refrigerator and set it out for just 30-40 minutes before you need to add it to the meringue. Sometimes meringue takes longer than usual or it needs a break (see Troubleshooting above) and in that case, you should place the butter back into the refrigerator for a few minutes so it doesn’t get too warm sitting out. The butter should be cool to the touch. For accuracy, I recommend using an instant read thermometer. Butter should be 60°F (16°C).
  6. Flavors & Colors: For flavor ideas including chocolate, see my Can I add flavors? FAQ above. For coloring, it’s best to tint this frosting with gel food coloring so you aren’t adding a lot of extra liquid. Beat food coloring into the frosting on low speed after you add the vanilla extract and salt.
  7. Half or Larger Batch: You can halve this recipe. The egg white/sugar mixture won’t take as long to cook and the meringue won’t take as long to reach stiff peaks. I do not recommend making larger batches at a time because it will quickly overcrowd and wear out your mixer. If you need more batches, make them all separately.

Happy 20-10 Boo!!!!

Happy Birthday, Boo!!  It’s so hard for me to believe that thirty years have flown by so fast.  Why it seems like just yesterday I was rushing home from my morning bowling league to change clothes to head off to my afternoon Bridge Club.  Seriously.  It sounds like a sad, dumb drama from the 1980’s, but that was my life.  And I did not realize how unfulfilled it was until you came into my life.

Once I hung up the phone from the doctor asking if we were still interested in adopting I was bouncing off the walls, the ceiling, it was as if I could bounce from one cloud to another.  And the poor doctor?  I am sure he was rushing off to my Audiologist to get his hearing tested.  Pretty sure my screams of joy broke both of his ear drums.  The next twenty-eight hours flew past me in a huge, beautiful, pink blur.  I remember a friend taking me out to shop for supplies to get us through the first night.  But what I really remember was pushing two carts through Wal-Mart both loaded to the brim with bottles, brushes, bottle nipples, onesies, blankets, diapers, sheets, formula, nightgowns, wash cloths, towels, bibs, bath soap, baby lotion, baby oil, baby socks, petroleum jelly, nasal aspirator, baby shampoo, burp cloths, bibs, thermometer, diaper bag, diaper cream, wipes, changing pad, diaper pail, and that did not even start to include the car seat, crib, high chair, and the toys that I just knew you would want.

And then it was 4 p.m. that Thursday, about twenty-seven hours after your birth, and you were taking your very first plane flight.  Your birth parents placed you in the hands of the attorney and he flew you to us and placed you in my hands.  What a joy it was to drive you home, showing you places where you will go and things you will do as you grew up in our town.  Pretty sure I spent that first night (okay, I will admit it probably many more nights) just sitting in your room watching you breathe.  At birth you were only 6# 9.75 oz and 20 1/2 inches long.  Just totally precious.  From the time I was about twelve I just knew what my daughter’s name would be, however as I grew older I realized that when I first looked upon my baby girl it would be then that her name would come to me.  Imagine my joy when gazing upon your sweet face for the first time you opened your eyes, smiled at me, reached your arms up to hug me, and said “yes, my name shall be Megan Kathleen”.  Okay, maybe it did not happen entirely that way, but I do know that you just “looked” like a Megan Kathleen.  So be it – my dream came true in you.

I cannot thank your birth parents enough for all the joy and love they have given me by allowing me the honor of being your mother.  It was truly very courageous for them to admit that they were too young to raise a child and that they wanted something better for you.  They wanted to give you the opportunity of a future that they could not provide for you at that point in their young lives.  Adoption means love and I do love you.  From the time you were a wee one I always said the word “adoption” to you, so that you could understand that the word “adoption” meant love.  You were conceived in love and shared in love.  As you grew older I tried my best to be sure you understood what a great honor your birth parents gave to you and what difficult decisions they made along the way.  Perhaps some day I will be able to thank them for giving me this most precious gift of being your mother.  They gave me a treasure more precious than silver or gold.  I know that they must have a hole in their hearts that cannot be filled.  I know that God entrusted you into my caring arms that day, 20-10 years ago, and this is a gift I will never be able to repay.  I pray that they know that I am totally grateful for the sacrifice they made and how grateful I am that they did not take the easy way out.  This is a debt that I can never repay, but every day I pray that they are comforted in the knowledge that their sacrifice was not in vein.  You did grow up up in a family that loves you, that cares about your, and has supported you in all your endeavors.  My life would not be the same without you, Boo.

Now, I need to get myself busy making your Birthday Dinner.  We will have grilled ribeyes (from Leon’s Market), roasted asparagus and red peppers, your favorite potato salad and, of course, your Better Than Sex Cake for dessert.  When you were a wee one I made this cake for desert one night when we had some friends over for dinner.  You took such joy and naughty pleasure in telling your friends the next day at school that you had “sex” last night.  Your kindergarten teacher was a friend of mine, who dearly loved her students and their stories they shared with the class.  That day I was not sure who was crying more……….Mrs. F from laughter or me from embarrassment.  Since that time this has always been your requested birthday cake and since it is super easy to make and decorate I was always thrilled to oblige.  Today is no different!

Joy Rising!

Better  Than  Sex  Cake

Prep  Time: 20 minutes (excluding baking time)

Bake  Time: 30-35 minutes  at  temperature recommended on box

Source: Mary Scott

Ingredients:

  • 1 box german chocolate cake mix
  • 1 can evaporated milk
  • 1 small bottle caramel sauce
  • 1 large tub of cool whip, unfrozen
  • 6 skor candy bars

Directions:

  1. Prepare cake as per back of cake mix box.
  2. Once cake completely baked, remove from oven.
  3. Let stand about ten minutes, then using fork poke holes in cake (this will allow the caramel sauce and evaporated milk to seep into and throughout the cake).
  4. Pour over the cake the contents of the bottle of caramel sauce (I usually pour on half, let it soak in, and the pour the remaining half).
  5. Once the caramel sauce has basically soaked into the cake pour on the evaporated milk.
  6. Keeping the candy bars in their wrappers, crush into little bits (I use the bottom of a heavy sauce pan).
  7. Once the evaporated milk has basically soaked into the cake, spread on the Cool Whip.
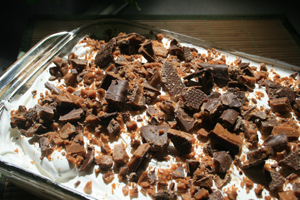
  8. Sprinkle the crushed Skor candy bars over the cake.
  9. Cut into small pieces to serve (this cake is very rich).

Honey  Dijon  Potato  Salad

Prep  Time: 20 minutes

Cook  Time: 90 minutes

Source: Rachael  Ray

Ingredients:

  • 2  1/2# small potatoes, quartered   (I like to use Yukon Gold and I do not peel)
  • 1/4 c honey
  • 1/4 c dijon mustard
  • 2 T cider vinegar
  • 1/3 c extra-virgin olive oil
  • 1/2 medium red onion, chopped
  • 3  ribs celery, chopped
  • salt and pepper to taste

Directions:

  1. Cover potatoes with cold water.
  2. Bring to a boil and salt the water.
  3. Boil potatoes until just tender  15-20 minutes;  drain.
  4. While potatoes are still hot, combine the honey, mustard and vinegar in a bowl.
  5. Slowly whisk in the olive oil.
  6. Season with salt and pepper.
  7. To the bowl of dressing add the potatoes, onion and celery.
  8. Gently stir to coat the potato salad.
  9. Taste the salad to see if you need to add more salt and pepper if needed.

Enjoy!

Successful dinner……………..thanks to Leon’s and my Big Green Egg!!!  Love that Egg.

Here’s The Church…..Here’s the Steeple

Dearest Boo,  when you were a wee, tiny one you so enjoyed taking things apart, just to see what was inside.  I totally blame this on myself.  I was the one that introduced you to the nursery rhyme, “Here’s the Church”.  I was the one that insisted on teaching you how to do the hand part.  I was the one that showed you by cutting apple slices through the center horizontally will allow the stars to present themselves into a star shape.  I was the one that showed you a sand dollar and how, when you break it open, five little “bird” shells will fall out.  I am to blame on your passion for knowing what is inside.

When you were in grade school there was not one broken electrical appliance that you did not take apart, or at least try, to take apart to see what was inside.  You called them your “experiments”.  The last “experiment” that I remember was coming home to see you sitting calmly on the floor in the middle of our family room.  The entire carpet was covered with parts of a radio.  Perhaps I had a budding Thomas Edison on my hands?  No. You promised me that you would be able to put it back together.  After several days we both could tell that that was not going to happen, so then your promise turned into the statement that you would clean up your mess.  After several days I got a trash bag and threw all the parts, components, wires, whatever into the bag and out to the trash.  I guess I had a budding Oscar the Grouch living with me.

You next moved on to “potions”.  The counters in the kitchen and bathroom would be covered with your messes where you were experimenting on mixing on thing with another.  As a parent I learned to “pick my battles”.  On this one I felt that by my encouraging you to mix up “potions” this would increase your curiosity and joy when you got to high school and took your required chemistry class.  Perhaps I had a budding Madame Curie on my hands?  No.  I guess I had a budding Dr. Bunsen Honeydew living with me.

The good news is that through all your learning I learned to like to know what is inside of things, how is you mix A with B you will get C.  You may be wondering what in the world I am trying to say.  Well, the point of all of this is that I found this awesome idea on one of my favorite blogs (http://iammommy.typepad.com/i_am_baker/2010/02/heart-cake-tutorial.html).  This young mother is just amazing in the projects that come out of her kitchen.

Your Aunt Charlotte’s birthday is today, Valentine’s Day, so I just knew that I had to try this for her.  This took me forever to try it.  And how dumb that was, as it is just a cake.  What is the harm that would come from it if I failed?  One of favorite women once said, “You gain strength, courage and confidence by every expierence in which you really stop to look fear in the face. You are able to say to yourself. ‘I lived through this horror. I can take the next thing that comes along'” (Elenor Roosevelt).  It took two tries all on my own, before Amanda had the tutorial on her website showing how she did what she did.  Finally, after two failed tries, we had success and that was only because I found the directions.

Here are the final cake box, the final cake and the second attempt’s “inners”.  Your Aunt Charlotte did call and said that she liked the cake and, without any hints on my part, knew what was inside.  So I am guessing it was a success.  I will have to try this again, just so that I can see the “inners” for my own self.

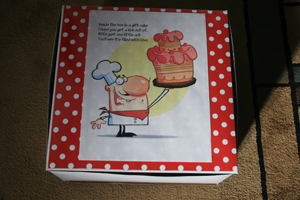
Here is the box

Too cute, right??

And here is the outside of the actual delivered birthday cake:

Four layers of delicious cake and yummy buttercream frosting.    Topped with strawberry cake crumbs.  Is your mouth watering yet?

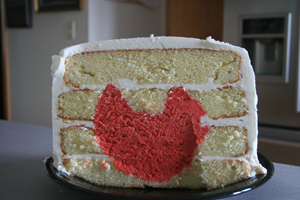
And, finally, what you have been waiting for……..the “inners” of Practice Cake 2….

That’s right…………………it’s a heart “inner” cake!  Don’t look too close, as you will see that I clearly don’t know what a heart looks like.  Hopefully, I learned from this one and my actual cake’s heart was more pointed in the center.  I had a delivery service take it to your Aunt Charlotte at her work, just so that she would be surprised and not know who sent her this masterpiece.  But alas, I failed to tell the young man who was doing the delivery to take off the paper with the address as I feared Aunt Char would recognize my handwriting.  And she did……the jig was up.

And speaking of the poor delivery man………..I forced the remaining half of  the cake off onto him.  He must have thought that I was some kind of witch, like from “Hansel and Gretel”, as I was running around the house giving him any leftovers I could find.  The poor man could not get out the door fast enough!  On the plus side, all sweets are cleared out of our home, at least for today.  For directions on how this awesome cake is made please go here http://iammommy.typepad.com/i_am_baker/2010/02/heart-cake-tutorial.html.

Bottom line, on this day of love, what most people need to learn in life is how to love people and use things instead of using people and loving things.  That is what I want you to remember, Boo.  It is not how much you do, but how much Love you put into the doing that matters (Mother Teresa).  This cake was filled with Love that you could see and Love that you could taste.  Joy Rising.